Browser clickpaths are a great way to synthetically monitor the availability and performance baseline of your application’s business-critical workflows 24/7. With Dynatrace, you can record complex transactions in no time, and with the latest release of Dynatrace, clickpaths have several major new features.
Clickpath as JSON script
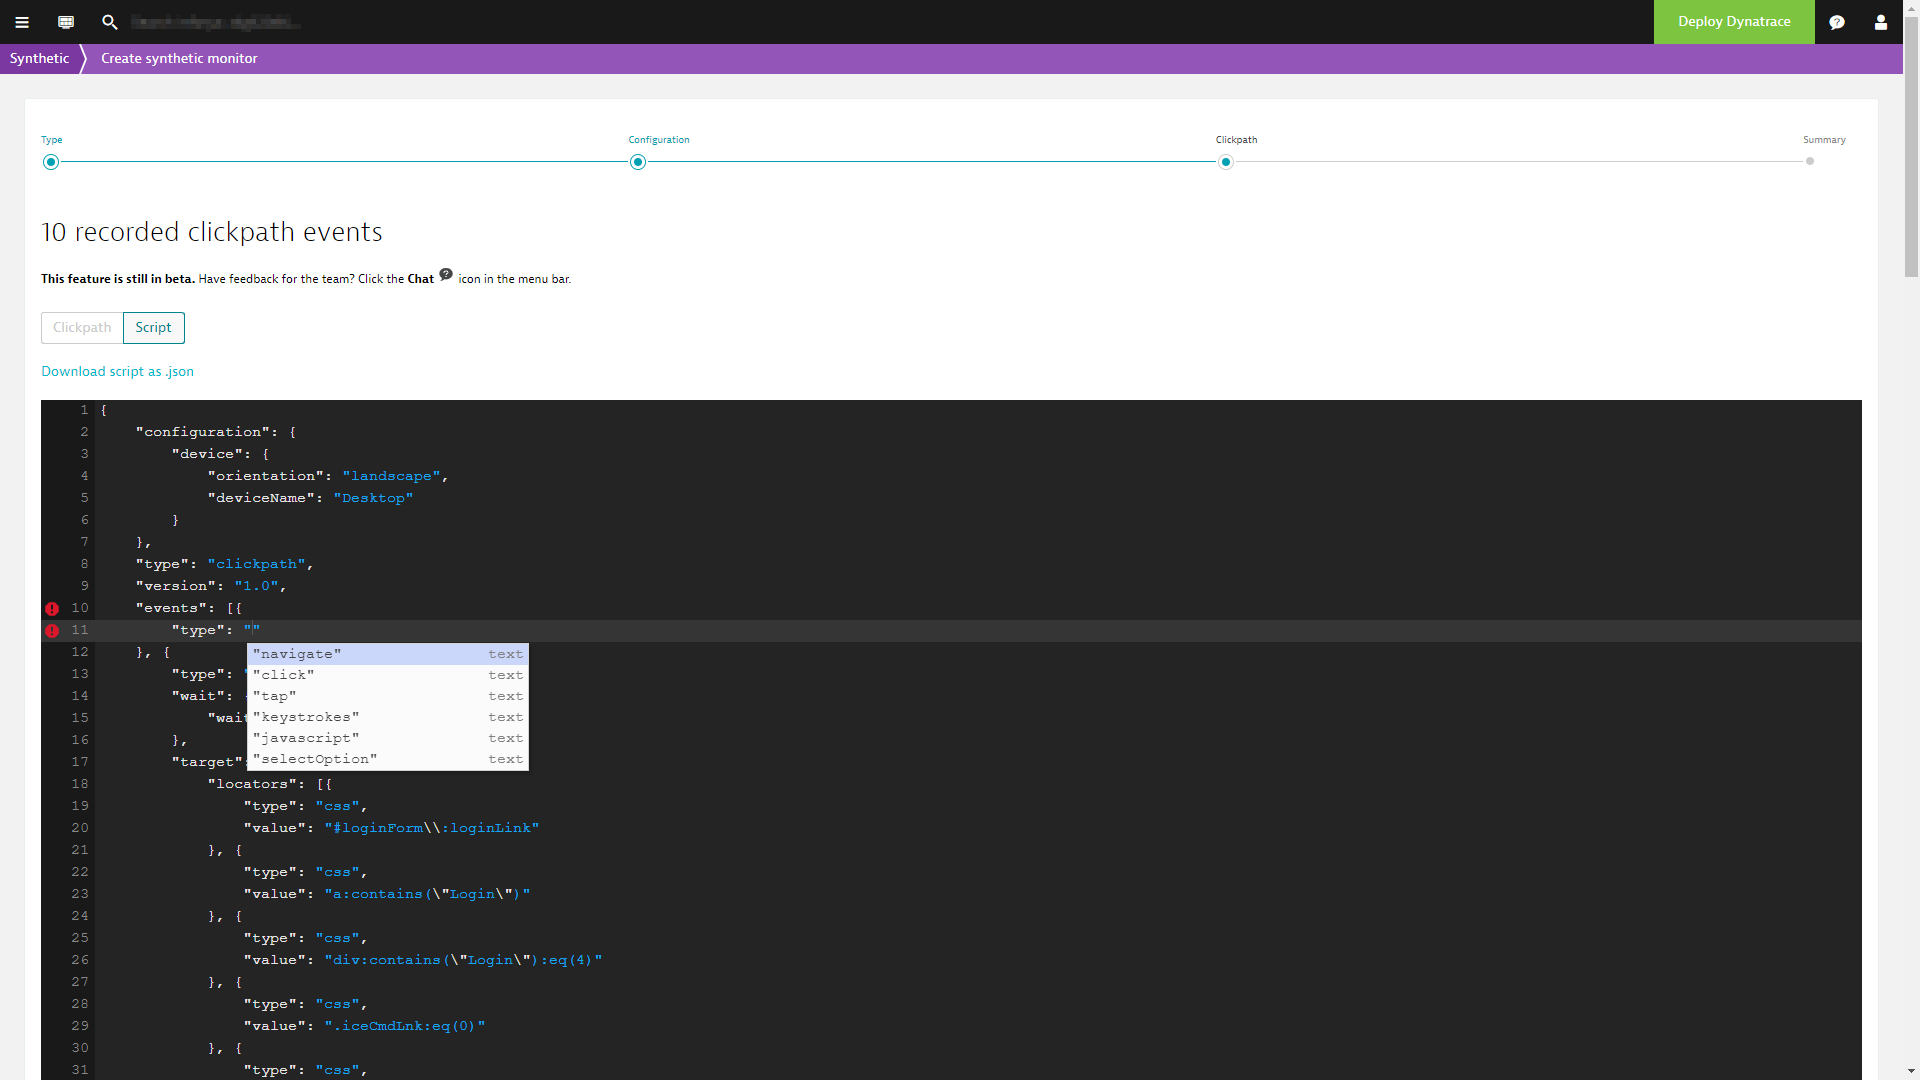
One of the first new things you’ll notice during the creation of a clickpath, or while editing an existing clickpath, is the Clickpath/Script switch. Even though you don’t need any scripting knowledge to use clickpaths, you can now access the underlying JSON script. If you’re a synthetic power user, this will make your life a lot easier and allow you to speed up clickpath creation and management. Use the script editor to quickly find specific events (steps), adapt locators across the whole script, or edit parts of the clickpath without re-recording.
The clickpath .json script consists of a configuration object (that holds, for example, the device profile and orientation) and an array of events. Typically, events are navigation to a URL, a click, keystrokes, or a JavaScript snippet that simulate interaction with your web application and are needed to control the clickpath. Besides the type, events have different properties, like the target (consisting of locators to identify web elements within a page) and the wait strategy.
Note that an event is not the same thing as an action—only events that trigger web requests are called actions, so your script might not have as many actions as events. Synthetic actions (similar to user actions for Real User Monitoring) hold the performance data collected during the playback of clickpath events.
Feature highlights
- Clickpath JSON script directly editable in your browser
- Auto-complete (just press
Ctrl + space key) - Syntax highlighting
- Instant error validation (hover over the error icon to see details)
- Local playback to verify your changes
- Ability to download JSON clickpath script

UI updates
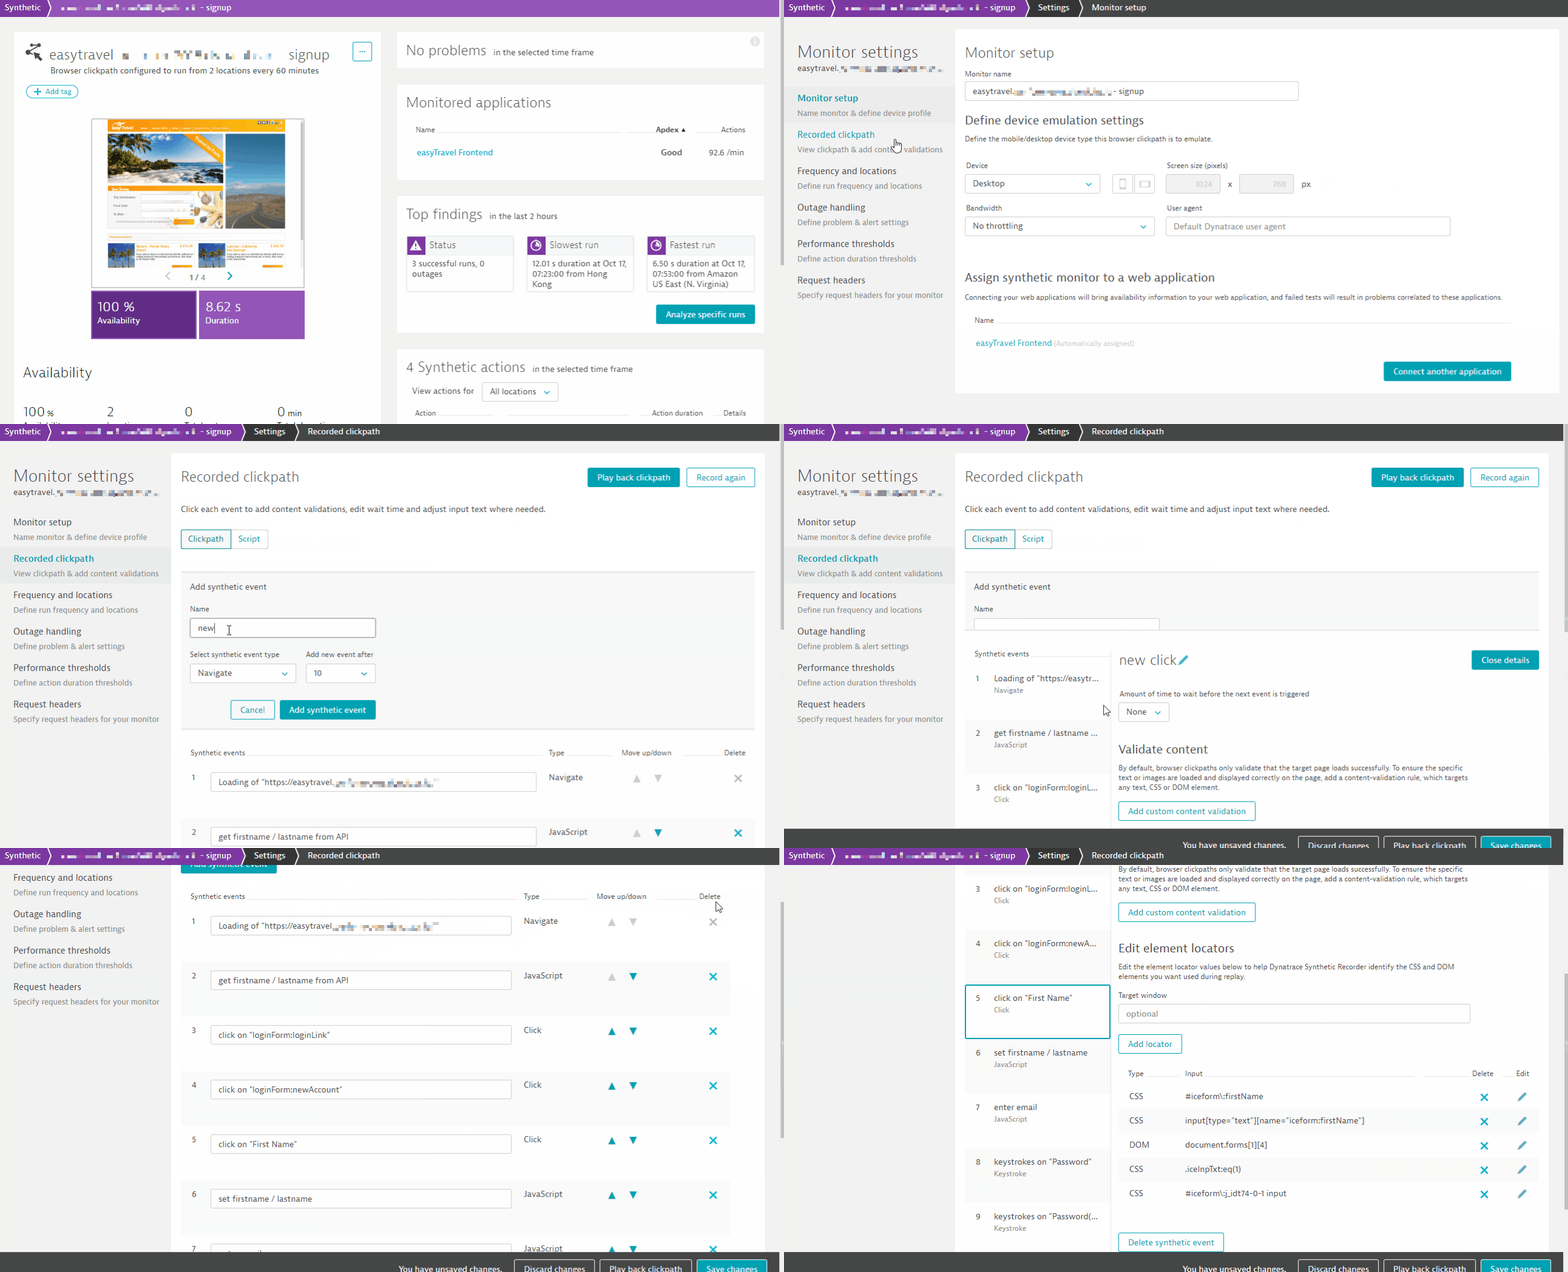
It’s possible to seamlessly switch between the script and visual representation of a clickpath any time during clickpath creation or editing. This helps to get familiar with the script format. The clickpath UI has also been extensively updated. It’s now a lot cleaner and easier to navigate. Hover over any synthetic event, and when your cursor changes to a finger pointer, click the row to edit the event—the UI opens up a detailed panel where you can access all properties of the event.
Additionally, it’s now possible to add synthetic events without having to re-record the whole clickpath. Just click Add synthetic event, then choose a name and event type. You can also reorder events using the up/down arrows in the list of synthetic events.

JavaScript event
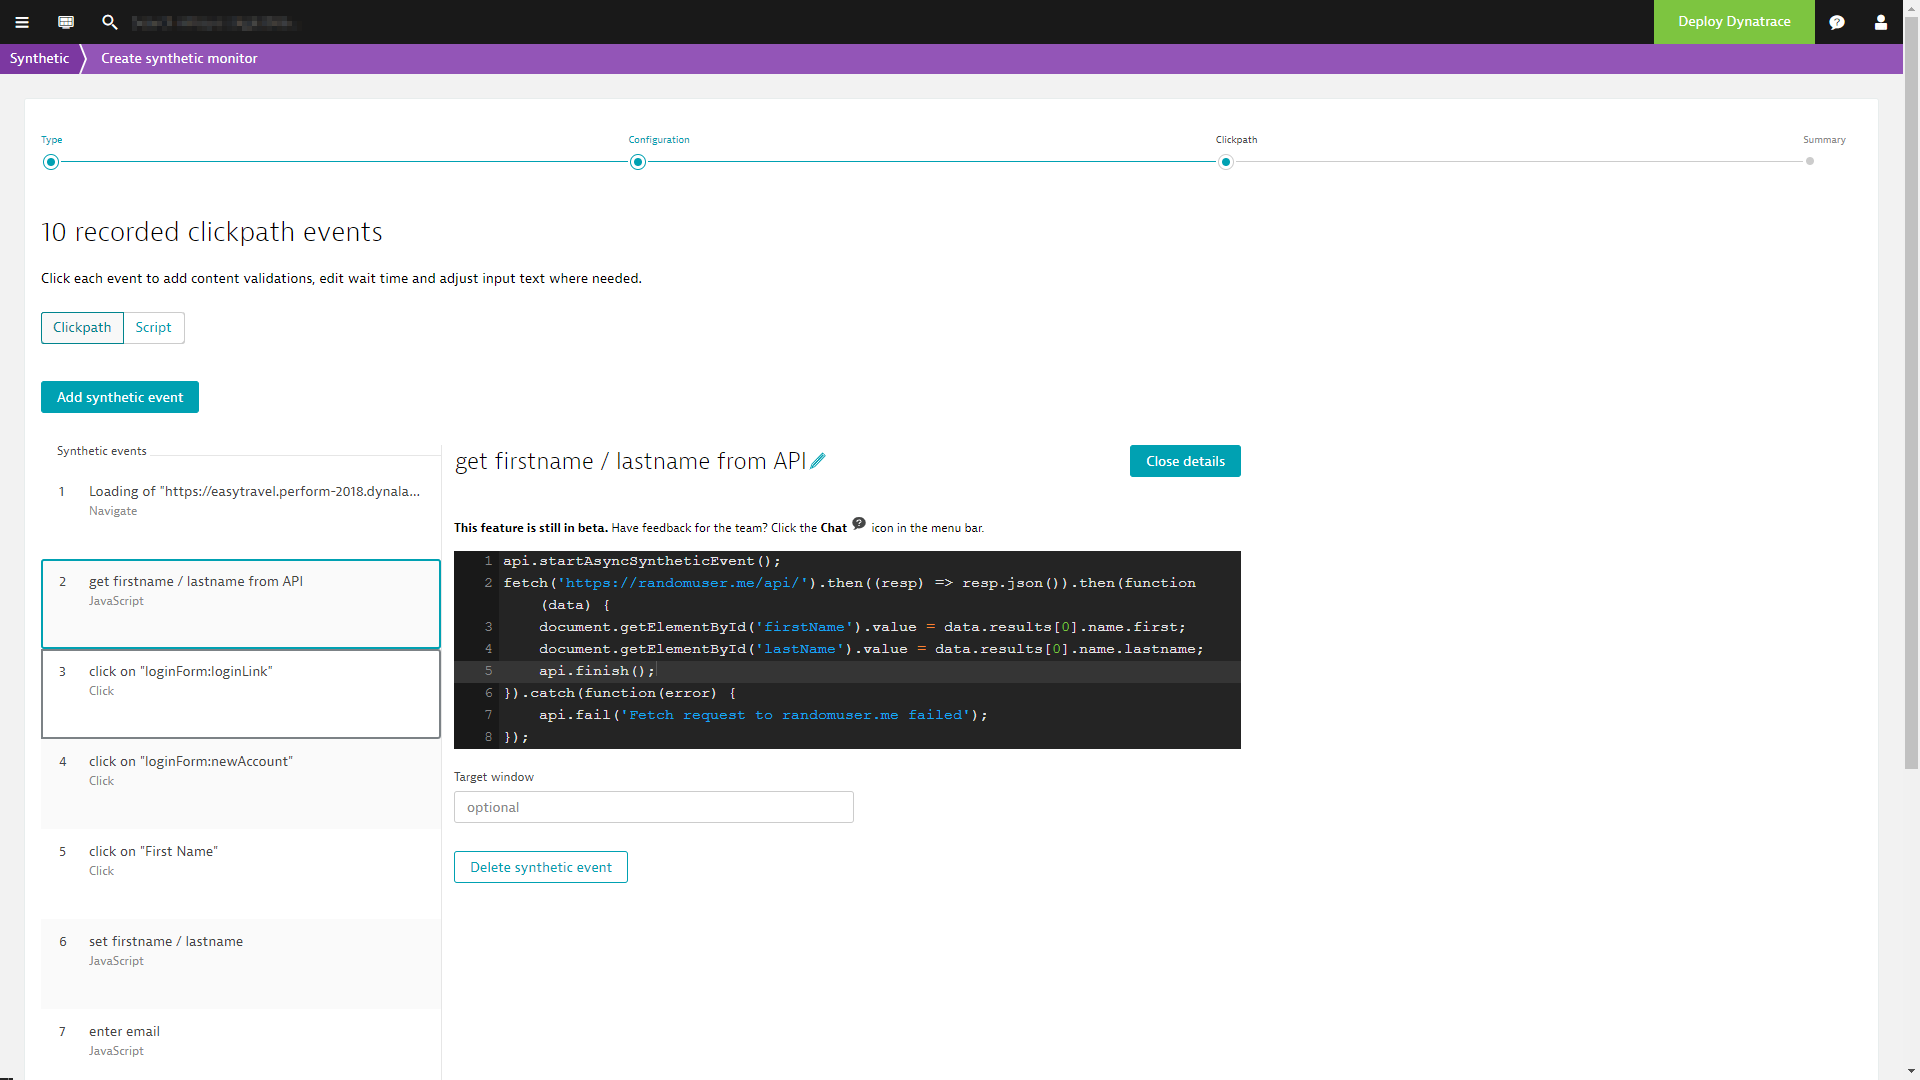
Looking at the available events, you might have noticed that there is a new event type: JavaScript. The JavaScript event allows you to execute snippets of JavaScript as part of the workflow of your clickpath monitors.
With the help of JavaScript events, it’s now possible to create clickpaths for scenarios that might not have been possible before, for example:
- Login flows including random security questions
- Complex date selectors
- Pages using A/B testing
- Signups or product order workflows
- Custom validations
All these scenarios are alike in that they include some dynamic parts where it might be necessary to react on the page. You can now do this with the JavaScript event.
Additionally, the JavaScript event offers a basic API that allows you to:
- Store and retrieve values across events (steps).
api.setValue(key, value)– Sets a local valueapi.getValue(key)– Gets the local value of thekeythat had been previously set byapi.setValue.api.getValues– Returns an object holding the key-value pairs that had been previously set byapi.setValue.
- Mark events as failed or finished.
api.fail(message)– Marks the event as failed, providingmessageas the reason and marks the test execution as failed.api.finish()– Finishes the JavaScript event so that the next event is executed.api.startAsyncSyntheticEvent()– Causes the JavaScript event to wait for a later call ofapi.finish()orapi.fail()to end it.
- Skip synthetic events.
api.skipNextSyntheticEvent()– Skips execution of the next event.api.skipNextSyntheticEvents(n)– Skips execution of the nextnconsecutive events.api.skipSyntheticEvent(eventIndex)– Skips execution of the event with the indexeventIndex.api.skipSyntheticEvents(eventIndexes)– Skips execution of multiple events; the arrayeventIndexesspecifies the indexes of events to skip.
- Basic logging
api.info(message)– Logs themessageusing the “info” log level.api.warn(message)– Logs themessageusing the “warning” log level.api.error(message)– Logs themessageusing the “error” log level.
Example 1 – Generate and set a dynamic email address for monitoring a sign-up process.
var email = 'synthetic' + Date.now() + '@example.com';

api.setValue('email', email);

document.getElementById('email').value = email;
Example 2 – Get a random first name / last name from an API endpoint and set it during a sign-up process.
api.startAsyncSyntheticEvent();
fetch('https://randomuser.me/api/').then((resp) => resp.json()).then(function(data) {
document.getElementById('firstName').value = data.results[0].name.first;
document.getElementById('lastName').value = data.results[0].name.lastname;
api.finish();
}).catch(function(error) {
api.fail('Fetch request to randomuser.me failed');
});

HTTP headers
You can now also set custom HTTP headers for you browser monitors (Single-URL as well as clickpaths). Just activate the Enable additional HTTP headers option during creation of a new monitor or in the settings of an existing monitor.
You can specify multiple HTTP headers (name and value), which will be set for all requests the browser monitor makes.
If you want to set headers only for specific requests, check Only apply headers to requests matching a pattern and then define a pattern. After that, the header is only set for requests that match the pattern you’ve defined.

Feedback and what’s next
We look forward to your feedback. Use the in-product chat or our Community forum and let us know what you think about these latest additions. We’re already working on the next feature set, which includes the ability to set cookies and use of our built-in wait strategies for JavaScript events, so stay tuned.


Looking for answers?
Start a new discussion or ask for help in our Q&A forum.
Go to forum