|
Johannes Bräuer Guide for Cloud Foundry |
Jürgen Etzlstorfer Guide for OpenShift |
| Part 1: Fearless Monolith to Microservices Migration – A guided journey | |
| Part 2: Set up TicketMonster on Cloud Foundry | Part 2: Set up TicketMonster on OpenShift |
| Part 3: Drop TicketMonster’s legacy User Interface |
Part 3: Drop TicketMonster’s legacy User Interface |
| Part 4: How to identify your first Microservice? | |
| Part 5: The Microservice and its Domain Model | |
| Part 6: Release the Microservice | Part 6: Release the Microservice |
After outlining our monolith to microservices approach in the introduction, I’m now going to breathe life into the monolithic app TicketMonster by deploying it on Pivotal Cloud Foundry (PCF) and preparing the monolith for its journey by starting with I call a “face-lift”. A “face-lift” in the sense of extracting the current user interface from the monolith so that it runs independently from the original codebase. To follow this part of the blog post series, you need two projects available on GitHub:
- monolith
- tm-ui-v1
In addition, this step of the migration journey will utilize Apigee Edge to properly introduce the new user interface. Hence, make sure to:
- sign in to your Apigee Edge account
- install Apigee CLI
Let TicketMonster live on Cloud Foundry: Lift & Shift
The initial step of the entire blog post series is the setup of TicketMonster. In a real-world monolith to microservice and Cloud migration scenario, this step might be obsolete since the monolith is already running somewhere in a data centers. In other words, you would leave the monolith where it is and just deploy microservices to the target Cloud platform; PCF in this case. Nevertheless, I decided to lift-and-shift TicketMonster to PCF to learn how to move this legacy system to the cloud platform. Besides, applications are easier to re-architect once they’re running in the cloud since we have already gained skills in handling data or traffic management.
To deploy TicketMonster, I refer to the instructions summarized on GitHub in monolith. These steps assume that the Cloud Foundry (cf) CLI is logged in to a PCF cluster to create a MySQL Cloud Foundry service instance. Besides, these instructions require a DockerHub account to park the containerized monolith before pushing it to the target cloud environment. Finally, a cf apps and cf services should list at least the ticket-monster app and ticketMonster-mysql service instance as shown below.

Based on the result of the previous steps, we can now hit TicketMonster for the first time and we can navigate through the application. Some clicks on the menu items give you an overview of the application’s business domain that is mainly about the management of events and booking of tickets.
https://ticket-monster.YOUR-SYSTEM-DOMAIN/index.html#/
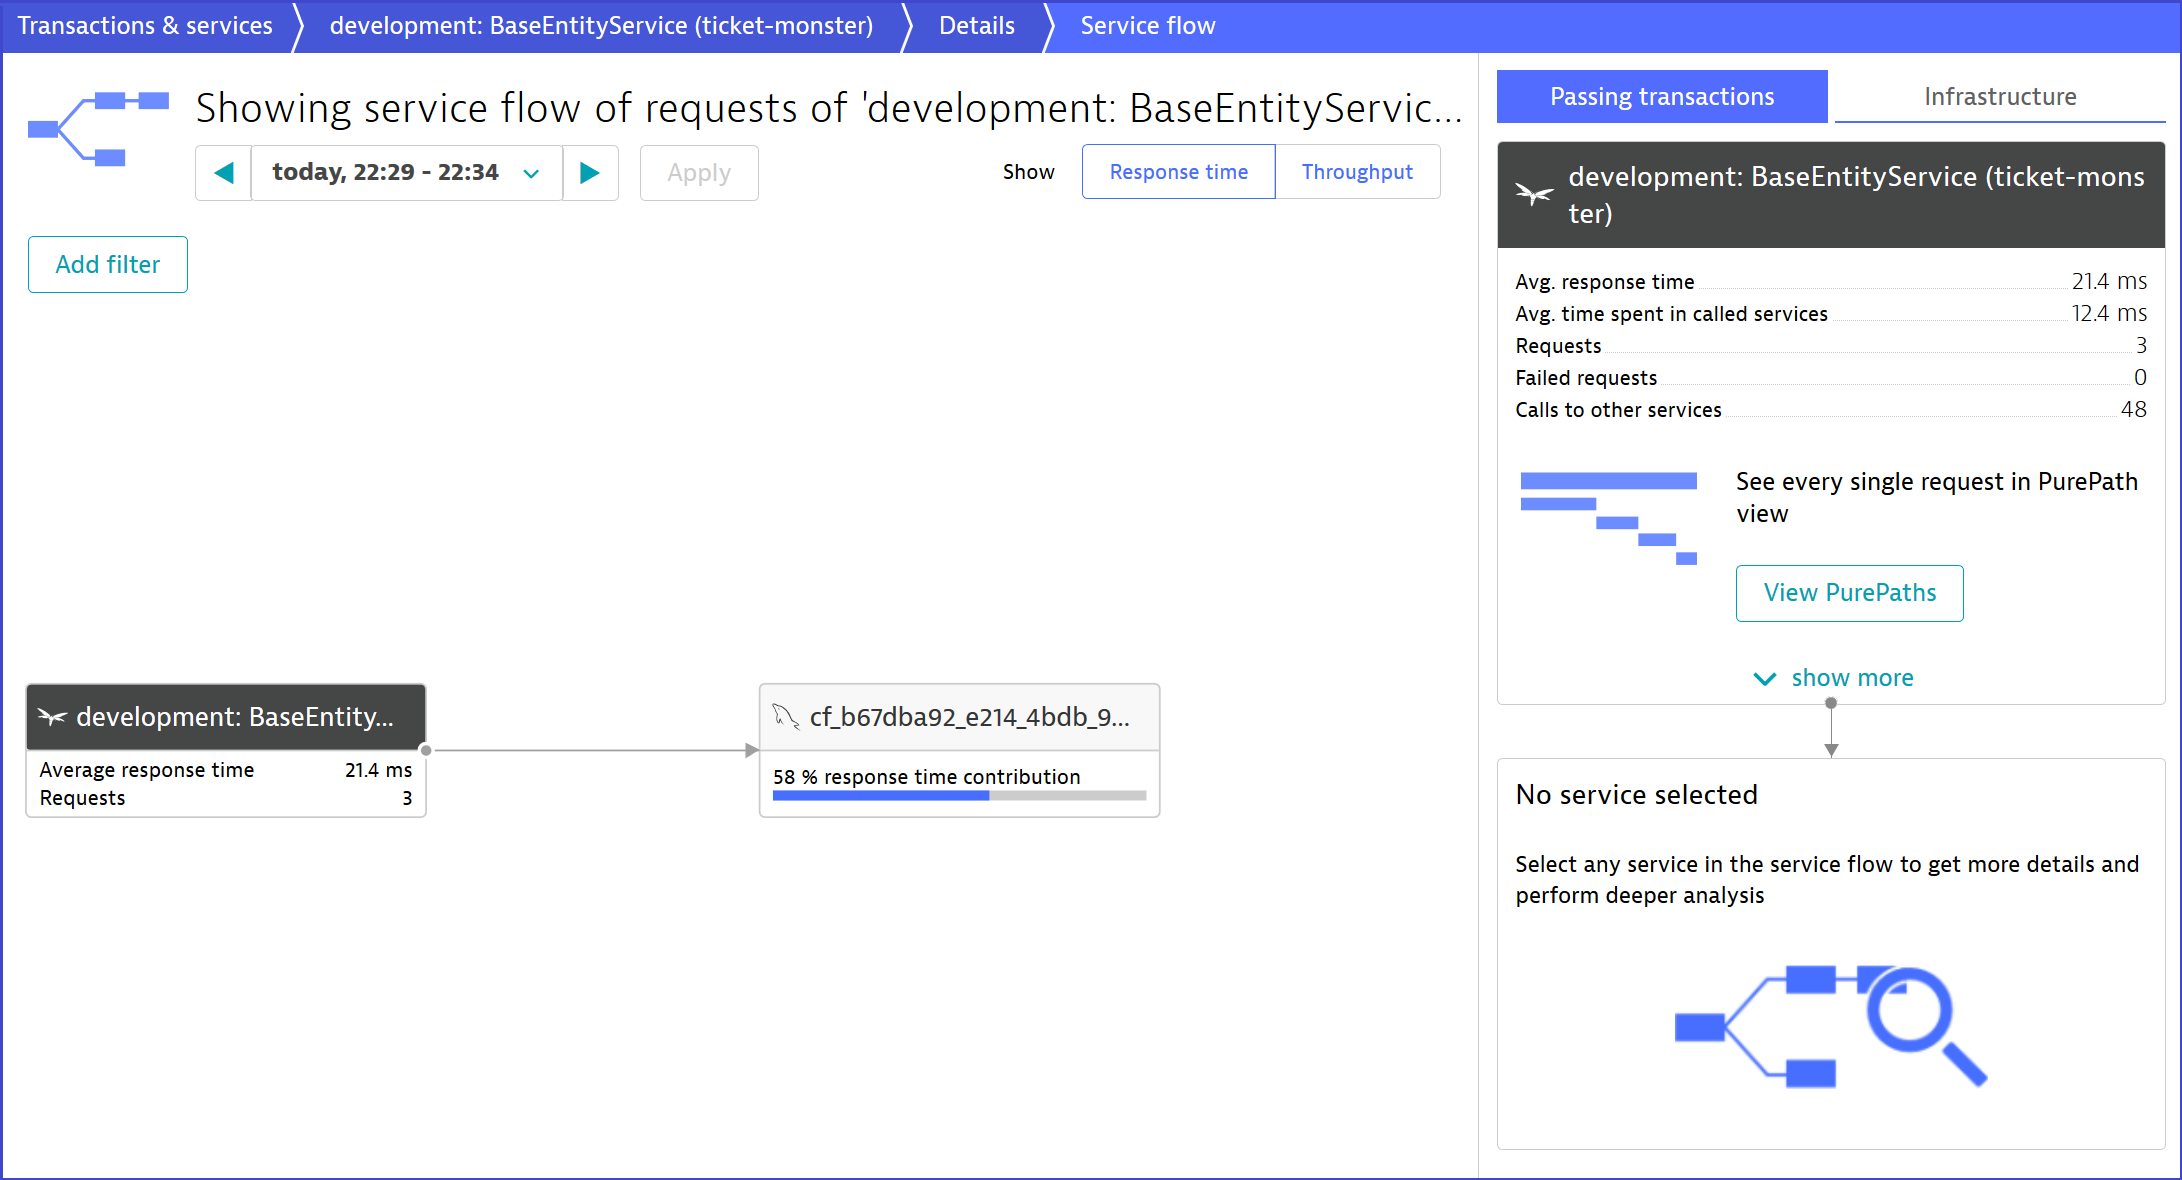
The monolith that is now available on PCF and can easily be monitored using Dynatrace full-stack monitoring on Cloud Foundry. Once Dynatrace is enabled, we get full insights such as the end-to-end service flow for our previous click scenario. The service flow in the following screenshot shows that the monolithic application queries the MySQL service instance we bound to the ticket-monster app.
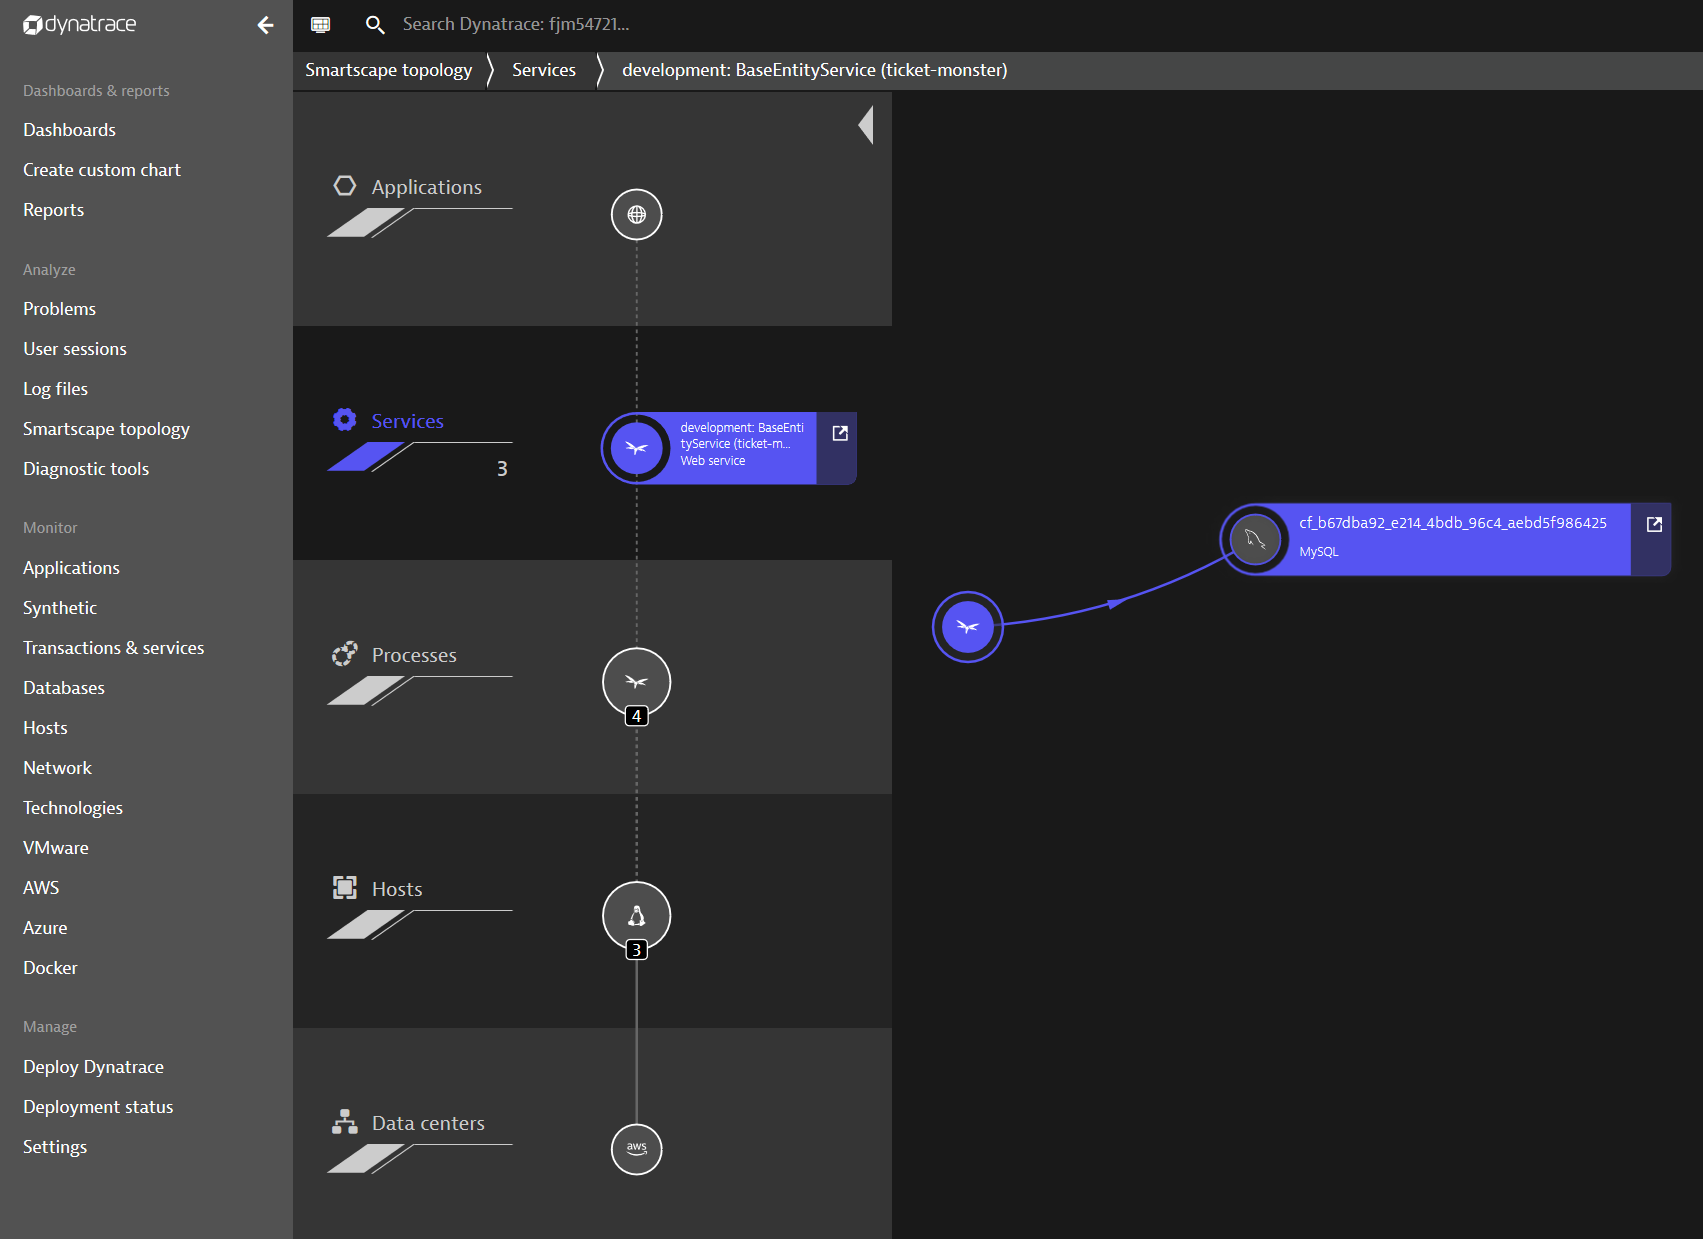
Another important Dynatrace feature to understand your monolith is Smartscape. Smartscape provides an overview of the application layers and gives you first ideas how to possibly slice it. All of this visibility comes out of the box with Dynatrace and without any additional code or configuration changes. By only enabling Dynatrace on PCF we already get to know our monolith just as Andi Grabner described in his 8-step recipe.
Extract the UI from TicketMonster: Decoupling
To start breaking up the monolith, a best practice is extracting the user interface from TicketMonster since this helps to decouple the client facing part from the business logic. The first task in this direction is the setup of an own repository for the decoupled component. This allows to independently develop the user interface and to deploy it without re-build the entire monolith. In fact, a dedicated codebase will be the foundation for any microservice we will extract, as it is one key factor to become a “12-factor-app“. Simply said, a “12-factor-app” defines twelve characteristics an application (microservice) should implement to be cloud-native. Our ongoing journey will take on some of them, as we explore further requirements.
For the sake of keeping this blog series as simple as possible, I didn’t create an own repository, but rather a folder called tm-ui-v1 that stays next to the codebase of the monolith. Afterwards, I copy the content of the UI, which is stored in ./monolith/src/main/webapp, to tm-ui-v1. To run the user interface, an Apache2 web server is used, which comes with the configuration file httpd.conf. In this file, it is required to define the ProxyPass and ProxyPassReserve to forward a user actions to the business logic of the monolith as shown below.
httpd.conf
# proxy for backend of TicketMonsterProxyPass "/rest" "http://ticket-monster.YOUR-SYSTEM-DOMAIN.com/rest"ProxyPassReverse "/rest" "http://ticket-monster.YOUR-SYSTEM-DOMAIN.com/rest" |
Before pushing the user interface as app to PCF, we need to create a Dockerfile that specifies the application server and runtime configuration. Based on this Dockerfile we can push an image to Dockerhub that allows to hit a cf push tm-ui-v1 -o <your dockerhub account>/tm-ui:monolith. This command creates the UI on PCF and sets it right in front of the monolith. To verify the step, a cf apps should show the new tm-ui-v1 app. For a step by step guidance on deploying tm-ui-v1, please take a look at the instructions summarized in tm-ui-v1.

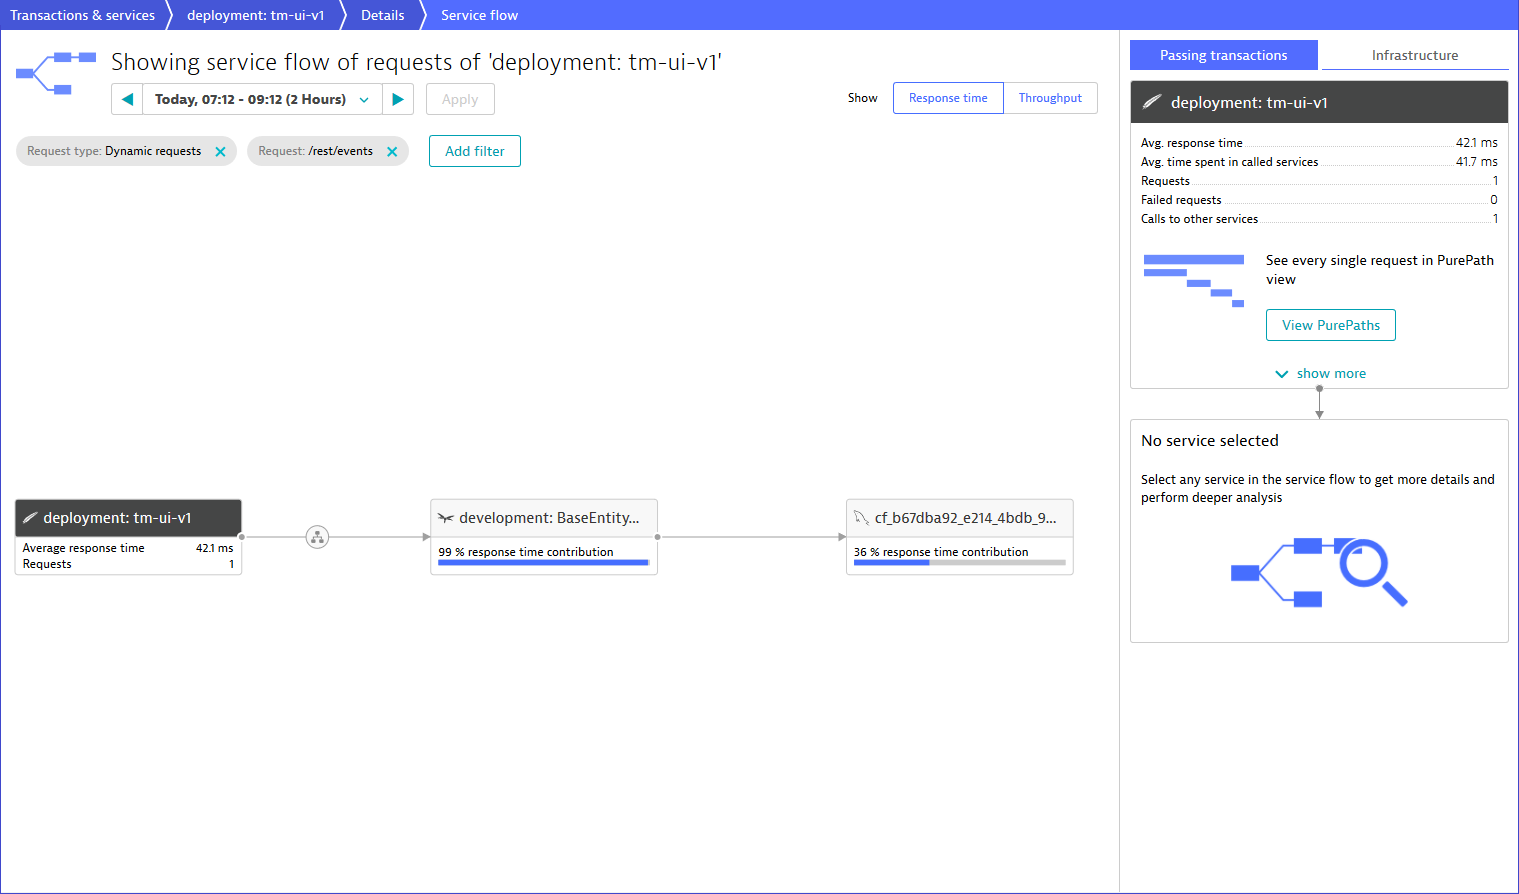
By using the above-mentioned URL of tm-ui-v1, a user calls the decoupled UI component, which forwards functional calls to the endpoints of the monolith. In other words, the new interface is strangling the monolith by consuming the backend services, however, by bypassing the still remaining UI in ticket-monster. A glance into Dynatrace now shows following service flow:
Control UI hits using Apigee Edge: (enabling) Canary Releases
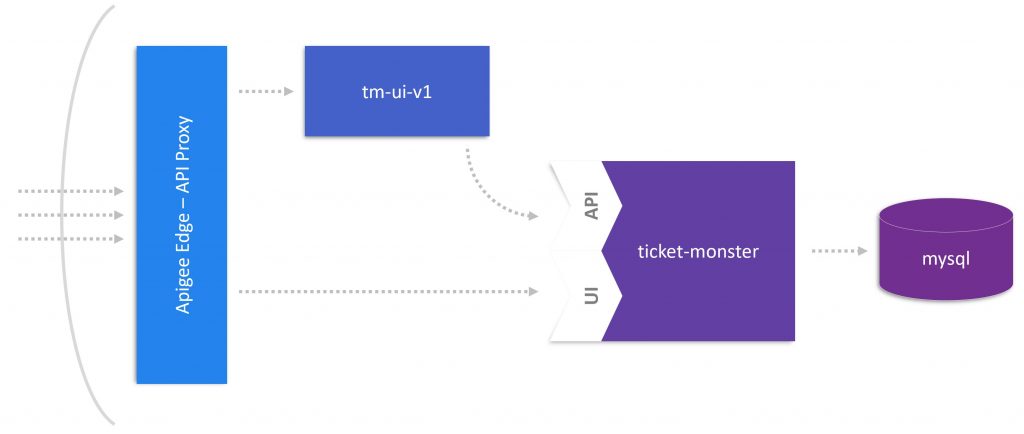
At this stage of extracting the user interface, it is not recommended to reveal the new UI to all end users because you cannot ensure that you didn’t miss a point. In other words, it is necessary to route some traffic to either tm-ui-v1 or still to the legacy UI of ticket-monster. To create this routing mechanism, I use Apigee Edge on PCF. This API management platform allows you to install an API proxy for handling request sent to a Cloud Foundry application. Thus, I utilize the API proxy to redirect TicketMonster traffic to its own or the new interface as illustrated below.
To make Apigee available on PCF, you must sign up for a free account. Then, it is required to install the CLI as best explained in the documentation about Proxying Cloud Foundry App. When taking a close look at this documentation, you will see three different service plans for an Apigee Edge service instance on PCF. In more details, these are the org, microgateway, and microgateway-coresident service plan that differ in their feature set and where Apigee Edge is hosted. For this blog post, I stick with the org plan that takes full advantage of Apigee Edge’s feature set to redirect traffic meant for the application to the Apigee Edge proxy. The above-mentioned documentation perfectly instructs the way to set up an API proxy for an app; ticket-monster in our case. Consequently, you should see the new service when typing cf services.

Although the newly created proxy is just a pass-through, we can now add policies or traffic control mechanism. Therefore, the web interface of Apigee Edge provides the possibility to either select, for instance, pre-defined load balancer rules or to write custom code. For latter of which you simply select the created API proxy in Apigee Edge and locate the cf-set-target-url.js file. This file sets the target URL and can be modified to redirect a request to another target.
/* retrieve variable saved from cf-header and assign target.url*/var cfurl = context.getVariable('cf-url');var rand = Math.floor((Math.random() * 2) + 1);if(rand % 2 === 0) { cfurl = cfurl.replace("ticket-monster","tm-ui-v1"); context.setVariable('request.header.X-Canary',"tm-ui-v1");} else { context.setVariable('request.header.X-Canary',"ticket-monster");}context.setVariable('target.url', cfurl); |
As shown by the code snippet above, I create a mechanism that randomly sets tm-ui-v1 as target user interface by a fifty percent chance. Consequently, the decoupled UI of ticket-monster gets randomly selected to test whether it works correctly and can take over the entire traffic. To see the request that are routed through the new user interface and to identify possible issues, the code adds the http request header X-Canary with either the value tm-ui-v1 or ticket-monster. Based on this value, we can use the Dynatrace feature request attributes to filter and search for those requests routed through the new user interface.
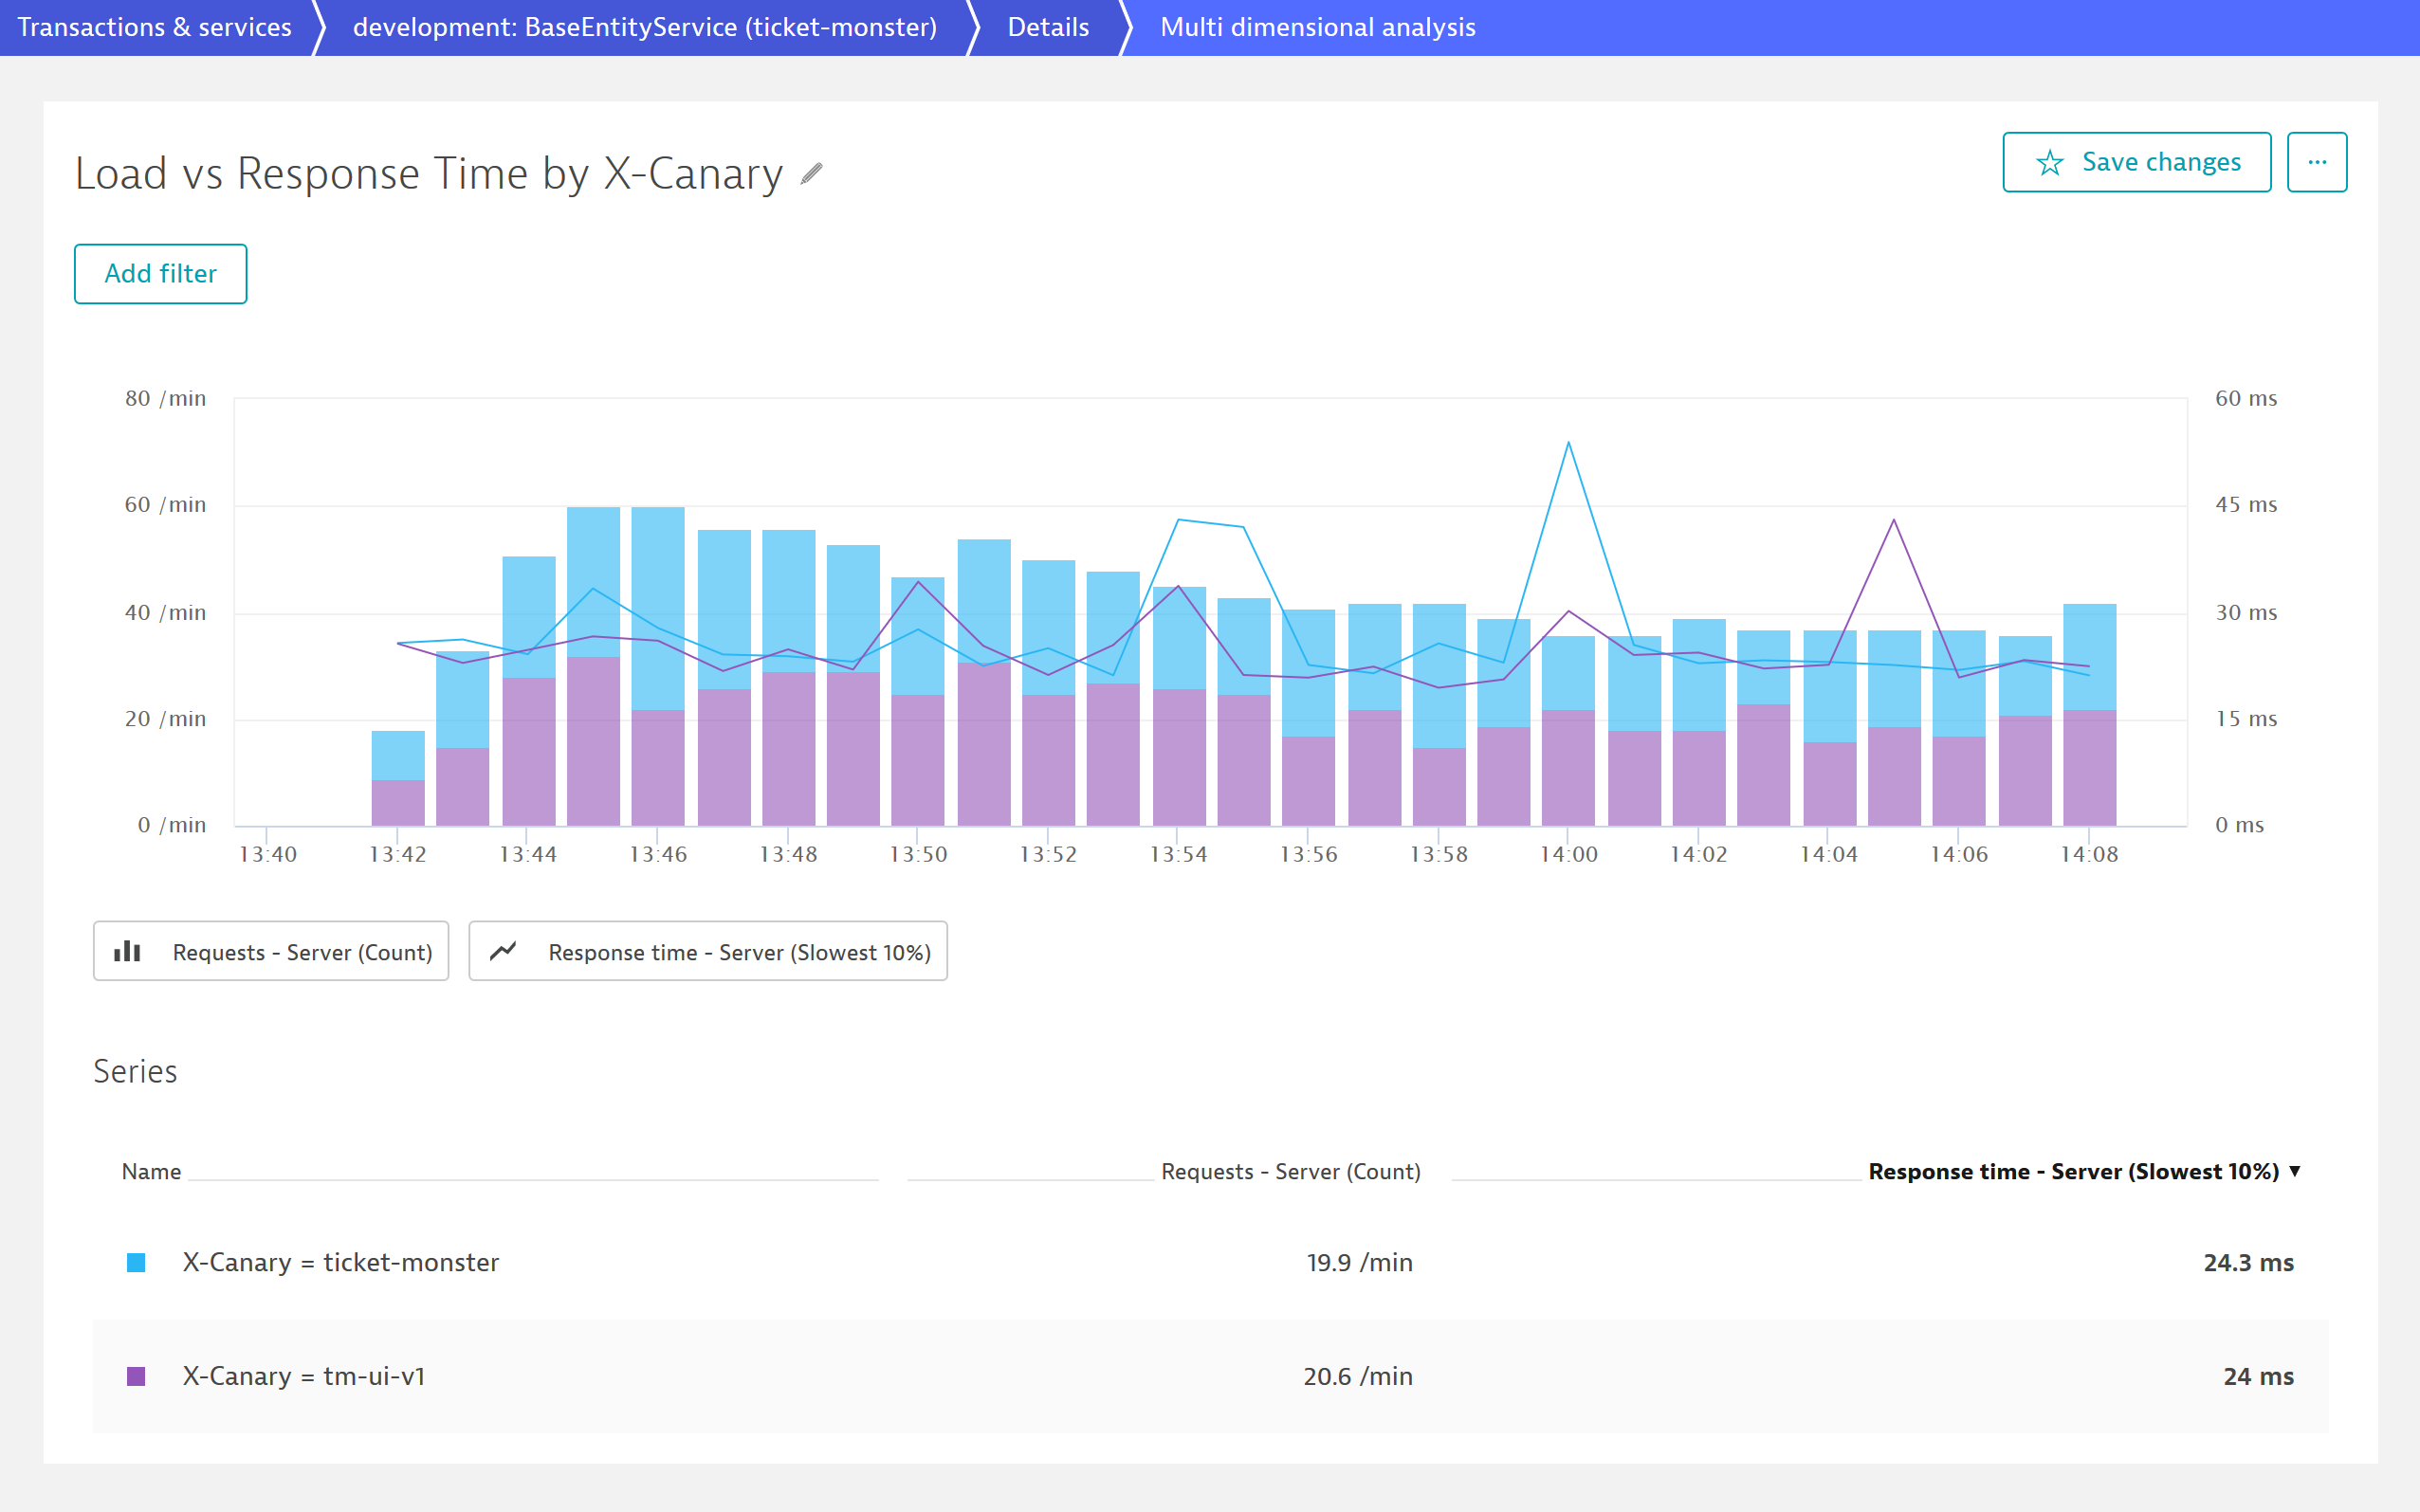
The above screenshot shows the monitored traffic of TicketMonster for about 30 minutes. As we can see, the monolith receives around 40 requests per minute and has a response time of 24 ms. The great thing is that Dynatrace divides the user requests based on the X-Canary header value and depicts the traffic routed through tm-ui-v1. As intended by my routing mechanism in Apigee Edge and displayed by the purple and blue bars, fifty percent of users face the new UI while the other group is still working with the old UI of TicketMonster.
Outlook
Based the decoupled UI component that is installed right in front of the monolith, the next blog post focuses on getting rid of the legacy code that is left over in the monolith. Consequently, a new and thinner version of the monolith will become available I’m going to deploy as canary release. Therefore, we will further expand the feature set of Dynatrace and Apigee Edge that give us the power to compare the old and new version regarding performance changes.




Looking for answers?
Start a new discussion or ask for help in our Q&A forum.
Go to forum